Connecting Dishwasher Drain to Garbage Disposal High Loop

Steam Gift Card vs Wallet Code: What’s the Difference?

How Smart Reminders Are Changing Everyday Productivity
Installing a dishwasher in your kitchen requires careful attention to the drainage system to ensure proper function and prevent issues like leaks or clogs. One critical aspect of this setup is connecting the dishwasher drain to the garbage disposal using a high loop. This method helps prevent backflow and ensures compliance with plumbing codes. At Accure Home, we understand the importance of a reliable plumbing setup, and this guide will walk you through the process step-by-step, offering practical tips and insights for a successful installation.
Why a High Loop is Essential for Dishwasher Drainage
A high loop is a simple yet effective plumbing configuration where the dishwasher drain hose is looped up to the highest point possible, typically under the countertop, before connecting to the garbage disposal. This setup prevents wastewater from the garbage disposal or sink from flowing back into the dishwasher, which could cause contamination or damage. Additionally, many local plumbing codes mandate a high loop or an air gap to ensure safe and sanitary drainage. Understanding this setup is crucial for homeowners looking to install or troubleshoot their dishwasher drainage system.
For those dealing with older homes, you might encounter a mix of piping materials, such as galvanized steel and PVC. In such cases, a galvanized to PVC adapter is essential to securely connect different pipe types while maintaining a watertight seal. This adapter ensures compatibility and simplifies the connection process, especially when integrating modern appliances with older plumbing systems. By following the steps outlined in this article, you can achieve a seamless and code-compliant dishwasher drain setup.
Tools and Materials Needed
Before starting, gather the necessary tools and materials to ensure a smooth installation process. Having everything on hand prevents delays and ensures you can complete the job efficiently. Here’s what you’ll need:
- Dishwasher drain hose: Typically included with the dishwasher or purchased separately.
- Hose clamps: To secure the drain hose connections.
- Galvanized to PVC adapter: For connecting dissimilar pipe materials, if applicable.
- Screwdriver or nut driver: For tightening hose clamps.
- Plumber’s tape (Teflon tape): For sealing threaded connections.
- Cable ties or hose clips: To secure the high loop under the countertop.
- Pipe cutter or hacksaw: If modifications to existing pipes are needed.
- Adjustable wrench: For tightening fittings.
- Bucket and towels: To catch any water spills during installation.
Step-by-Step Guide to Connecting the Dishwasher Drain

Step 1: Turn Off Power and Water Supply
Safety is paramount when working with plumbing and appliances. Begin by turning off the power to the dishwasher at the circuit breaker to avoid electrical hazards. Next, shut off the water supply to the dishwasher to prevent leaks during installation. Place a bucket and towels under the sink to catch any residual water from the existing plumbing.
Step 2: Install the High Loop
The high loop is the cornerstone of a proper dishwasher drain setup. Take the dishwasher drain hose and route it to the highest point possible under the countertop, usually near the back of the cabinet. Secure the hose in place using cable ties or a hose clip. This elevated loop ensures that gravity prevents wastewater from flowing back into the dishwasher. Make sure the hose is free of kinks or sharp bends, as these can restrict water flow and cause clogs.
Step 3: Connect the Drain Hose to the Garbage Disposal
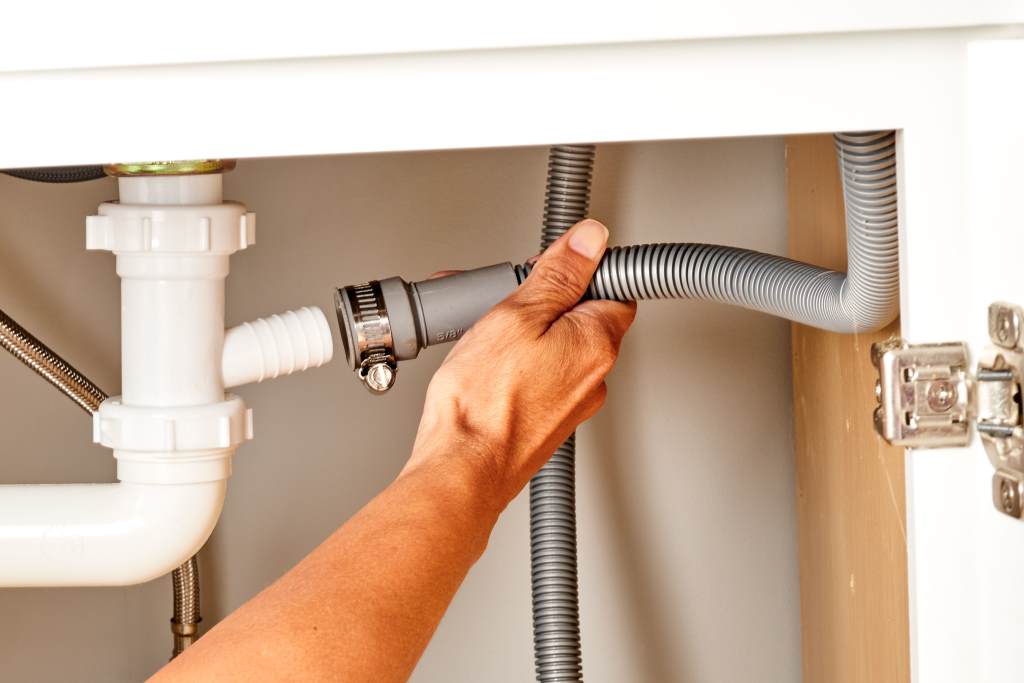
Most modern garbage disposals have a dedicated dishwasher drain inlet, typically a small port on the side of the unit. If the inlet is sealed with a knockout plug, use a screwdriver and hammer to gently remove it. Attach the dishwasher drain hose to this inlet, ensuring a snug fit. Use a hose clamp to secure the connection and prevent leaks. If your garbage disposal lacks a dishwasher inlet, you may need to connect the drain hose to a wye fitting on the sink’s drainpipe, which may require a galvanized to PVC adapter for older systems.
Step 4: Check for Proper Hose Length and Routing
The drain hose should be long enough to form the high loop and reach the garbage disposal without being stretched or overly slack. Excess hose length can create low points where water may pool, leading to clogs or odors. Trim the hose if necessary, but ensure it’s still long enough to maintain the high loop. Additionally, avoid routing the hose near hot surfaces, such as the dishwasher’s heating element, to prevent damage.
Step 5: Test the Connection
Once the drain hose is connected and secured, turn the water supply back on and restore power to the dishwasher. Run a short dishwasher cycle to test the drainage system. Check for leaks at all connection points, including the garbage disposal inlet and any adapters used. If you notice any leaks, tighten the hose clamps or fittings as needed. Ensure the high loop remains in place and that water drains smoothly without backing up into the dishwasher.
Common Issues and Troubleshooting Tips
Even with careful installation, issues can arise. Here are some common problems and their solutions:
- Backflow into the dishwasher: This usually indicates a missing or improperly installed high loop. Double-check that the hose is secured at the highest point under the countertop.
- Leaks at the garbage disposal connection: Ensure the hose clamp is tight and the connection is secure. If using a galvanized to PVC adapter, verify that it’s properly sealed with plumber’s tape.
- Clogged drain hose: Kinks or debris in the hose can restrict flow. Inspect the hose for blockages and straighten any bends.
- Slow drainage: This could be due to a clogged garbage disposal or sink drain. Run the garbage disposal to clear any debris and check the sink’s drainpipe for blockages.
Read Also:
Why Does My Dishwasher Make a Loud Grinding Noise Only During the Wash Cycle?
Smart Home Appliances: Revolutionizing the Modern Kitchen
Benefits of a Proper Dishwasher Drain Setup
A correctly installed high loop and drain connection offers several advantages. First, it prevents contaminated water from re-entering the dishwasher, ensuring clean dishes and a hygienic kitchen. Second, it complies with plumbing codes, which is essential for home inspections or resale. Finally, a well-executed setup minimizes the risk of costly repairs due to leaks or clogs. By investing time in proper installation, you can enjoy a reliable and efficient dishwasher for years.
FAQs
Why is a high loop necessary for a dishwasher drain?
A high loop prevents wastewater from the garbage disposal or sink from flowing back into the dishwasher, ensuring sanitary operation and compliance with plumbing codes.
Can I connect the dishwasher drain directly to the garbage disposal without a high loop?
No, a high loop or air gap is typically required to prevent backflow and meet plumbing codes. Omitting it can lead to contamination and drainage issues.
What is a galvanized to PVC adapter, and when do I need it?
A galvanized to PVC adapter is used to connect galvanized steel pipes to PVC pipes, often necessary in older homes with mixed plumbing materials to ensure a secure, leak-free connection.
How do I know if my garbage disposal has a dishwasher inlet?
Check the side of the garbage disposal for a small port, often sealed with a knockout plug. Consult the disposal’s manual if you’re unsure.
What should I do if my dishwasher drain is leaking?
Inspect all connections, tighten hose clamps, and ensure the high loop is properly installed. If using an adapter, verify it’s sealed correctly with plumber’s tape.
Conclusion
Connecting a dishwasher drain to a garbage disposal with a high loop is a straightforward process that ensures efficient drainage and compliance with plumbing standards. By following the steps outlined, using the right tools, and incorporating a galvanized to PVC adapter when needed, you can achieve a secure and reliable setup. Regular maintenance and troubleshooting can further enhance the longevity of your dishwasher’s drainage system. With this guide, you’re well-equipped to tackle the installation and enjoy a smoothly functioning kitchen appliance.