How to adjust the disc brakes on a mountain bike?

Free rehabilitation and detox centers
March 16, 2022
How to use the baby stroller?
April 12, 2022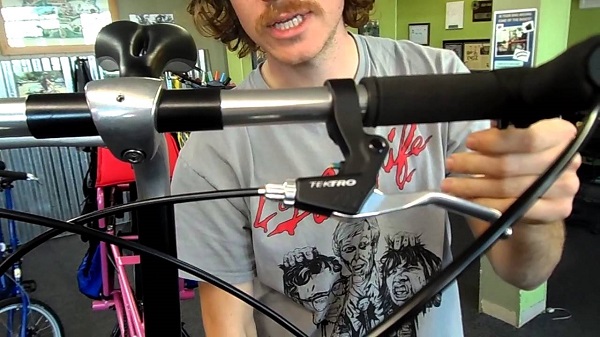
As a mountain biker, you know that adjusting the brakes on a bike can be a tricky task. For example, you may need to loosen the brake cable or adjust the pads. But, there’s one adjustment that’s often overlooked and that is the position of the rear disc brake. When searching for the best cruiser bikes for women, it’s crucial to consider the bike’s braking system; if you don’t adjust the disc brakes properly, your rear wheel will tend to lock up and you’ll lose control of your bike, highlighting the importance of understanding how to adjust the disc brakes on a mountain bike for safe and enjoyable riding. Read on to find out how.
How to adjust the disc brakes on a mountain bike?
Step 1: Remove the brake pads: Remove the brake pads from the disc brakes. Make sure the brake pads are completely removed.
Step 2: Loosen the disc brake lever: Loosen the disc brake lever by loosening the bolt that holds the lever to the handlebar. This will allow you to turn the disc brake lever.
Step 3: Turn the disc brake lever: Turn the disc brake lever to the side of the brake you want to adjust. This is the side where you want to adjust the brake.
Step 4: Adjust the disc brake: Pull the lever back and forth until the disc brake is the way you want it.
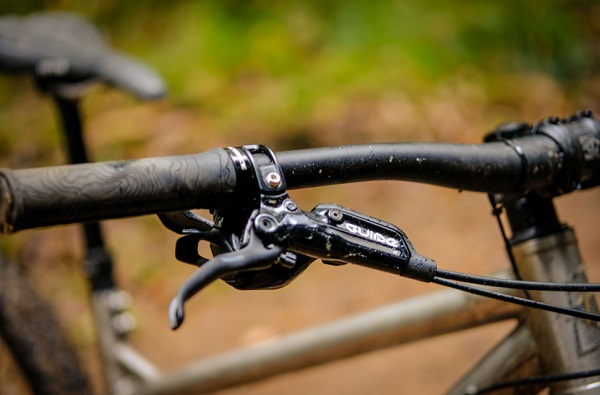
What to consider while adjusting the disc brakes on a mountain bike
A disc brake is one of the most popular braking systems on a mountain bike. It’s an excellent choice when it comes to braking power, but it can be tricky to adjust. Here’s what you need to know about adjusting your disc brakes. Keep reading https://coveredbridgesite.com/how-to-stop-a-beach-cruiser-bike/
- Get started: The first step is to get started. You’ll need to know the information you’re going to need to adjust the disc brakes. You’ll also need to make sure you’ve got all the tools you need.
- Adjust the disc brakes: The next step is to adjust the disc brakes. You’ll want to make sure you’ve got all the tools you need and that you’ve got everything ready for you.
- Apply pressure: Once you’ve adjusted the disc brakes, it’s time to apply pressure. You’ll want to make sure you’ve applied enough pressure to stop the bike, but not so much that you damage the disc brake pads.
- Check the disc brake pads: After you’ve applied enough pressure, it’s time to check the disc brake pads. You’ll want to make sure they’re still in good condition. If they’re damaged, then you’ll need to replace them.
- Adjust the caliper: Once you’ve checked the disc brake pads, it’s time to adjust the caliper. You’ll want to make sure the caliper is set correctly and that you’ve got all the tools you need.
- Adjust the brake pads: After you’ve adjusted the caliper, it’s time to adjust the brake pads. You’ll want to make sure they’re in good condition and that they’re set correctly.
- Test the brakes: After you’ve adjusted the disc brakes, it’s time to test them. You’ll want to make sure they work properly and that you haven’t damaged anything.
Tips and tricks to adjust the disc brakes on a mountain bike properly
- Make sure the bike is in good working order. It’s always a good idea to make sure you have a bike inspection before you start adjusting the disc brakes. You’ll want to make sure everything is in order, such as the brakes, the wheels, the gears and the tires.
- Make sure the brakes are adjusted correctly. The first thing you’ll want to do is make sure the brakes are adjusted correctly. You’ll want to ensure that they’re adjusted so that you can stop quickly and easily.
- Make sure the disc brake rotors are clean. You’ll want to make sure the discs are clean. You can use a cloth or a soft brush to clean them off. You should also check the caliper for any debris. If it’s dirty, you’ll want to clean it off.
- Clean the brake pads. You’ll want to make sure the pads are clean. You can use a cloth or a soft brush to clean them off. You should also check the caliper for any debris. If it’s dirty, you’ll want to clean it off.
- Make sure the pads are in good condition. You’ll want to make sure the pads are in good condition. You can use a cloth or a soft brush to clean them off. You should also check the caliper for any debris. If it’s dirty, you’ll want to clean it off.
- Make sure the wheel rim is in good condition. You’ll want to make sure the rim is in good condition. You can use a cloth or a soft brush to clean it off. You should also check the caliper for any debris. If it’s dirty, you’ll want to clean it off.
- Make sure the brake cables are adjusted correctly. The first thing you’ll want to do is make sure the brakes are adjusted correctly. You’ll want to ensure they’re adjusted so that you can stop quickly and easily.
- Check the brake cable. You’ll want to make sure the brake cable is adjusted correctly. You can use a tool to do this.
- Adjust the brakes to suit the terrain. The next step is to adjust the brakes to suit the terrain. You can adjust the brakes by using a tool or by looking at the disc brake rotors. You’ll want to make sure you’re not adjusting them too much.
- Make sure the bike is in good working order again. It’s always a good idea to make sure you have a bike inspection before you start adjusting the disc brakes. You’ll want to make sure everything is in order, such as the brakes, the wheels, the gears and the tires.
In conclusion, there are two common ways to adjust a brake: by loosening or tightening the bolts. When you tighten the bolts, you should use the following steps: First, turn the adjustment screw clockwise. Then, tighten the bolt with a wrench. If the disc is still not adjusted properly, loosen the bolts and repeat the steps.

